3D Fire Optimisation
Kryptos can automatically determine the number and placement of fire detectors required to meet your coverage targets.
There are two ways to do this:
- Optimisation — builds a new detector layout from scratch, placing detectors in suitable locations and orientations to achieve the specified coverage targets.
- Rearrangement — takes an existing detector layout and repositions its detectors to improve coverage.
Both processes require the same groundwork: defining the decks on which detectors can be placed and configuring the fire mapping settings that govern the calculations.
Before You Start
Make sure the following prerequisites are in place:
- The Fire Mapping you want to optimise must contain at least one Risk Grade. See Mapping for more details on how to create a Risk Grade.
- The area and its fire mapping must be calculated. In short, ensure that you have clicked on Run Area or at least Run Mapping for the Fire Mapping configuration that you want to optimise. See Running Calculations for more details on how to do this.
Step 1: Draw Decks
A deck is a flat, horizontal surface on which Kryptos can place detectors. It may represent a floor, platform, walkway or any other suitable mounting surface.
Kryptos places detectors only on defined decks. Detector placement heights are also measured relative to the deck. An area without decks cannot be optimised.
Decks belong to the area rather than to an individual mapping. If the area already contains the required decks, proceed to Step 2: Check the Fire Settings.
Select Decks in the area tree, then click Add Deck in the ribbon.
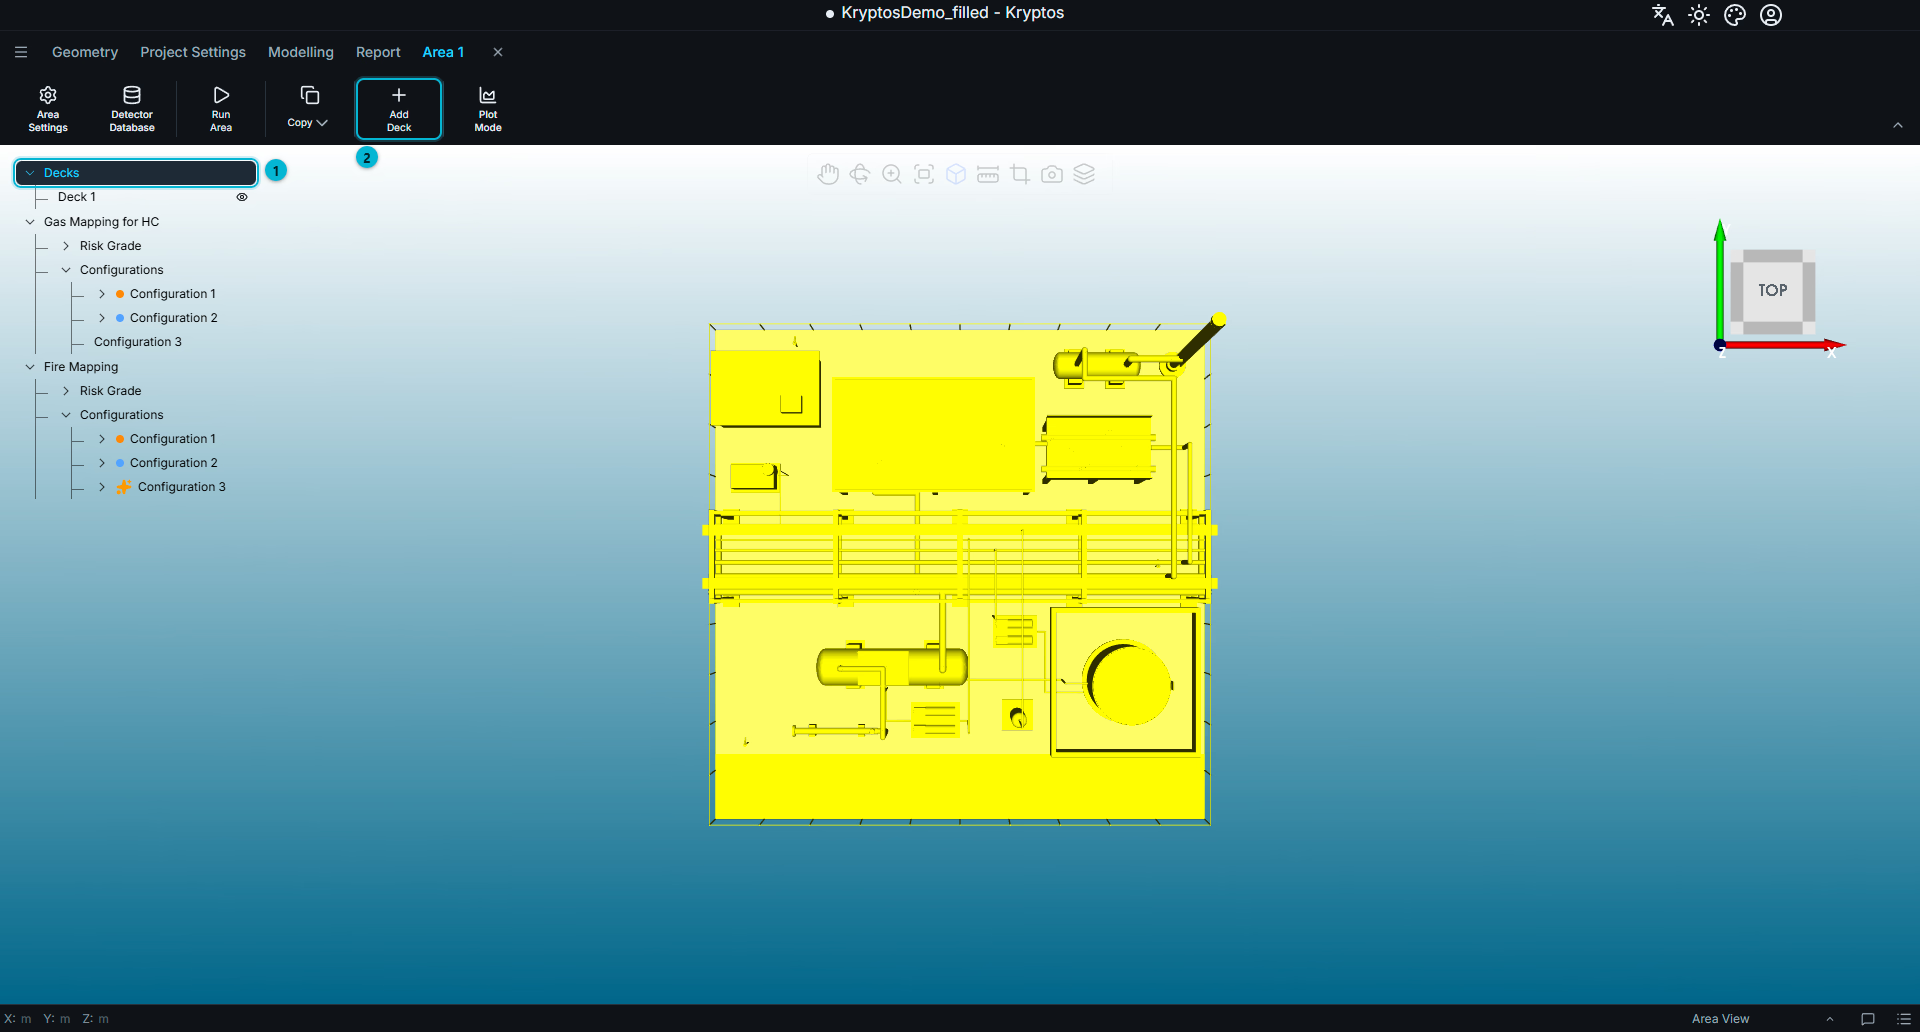
- Decks — select this item in the tree to display the deck-related controls in the ribbon.
- Add Deck — opens the drawing panel, where you define the properties and shape of the new deck.
The drawing panel contains the settings for the new deck.
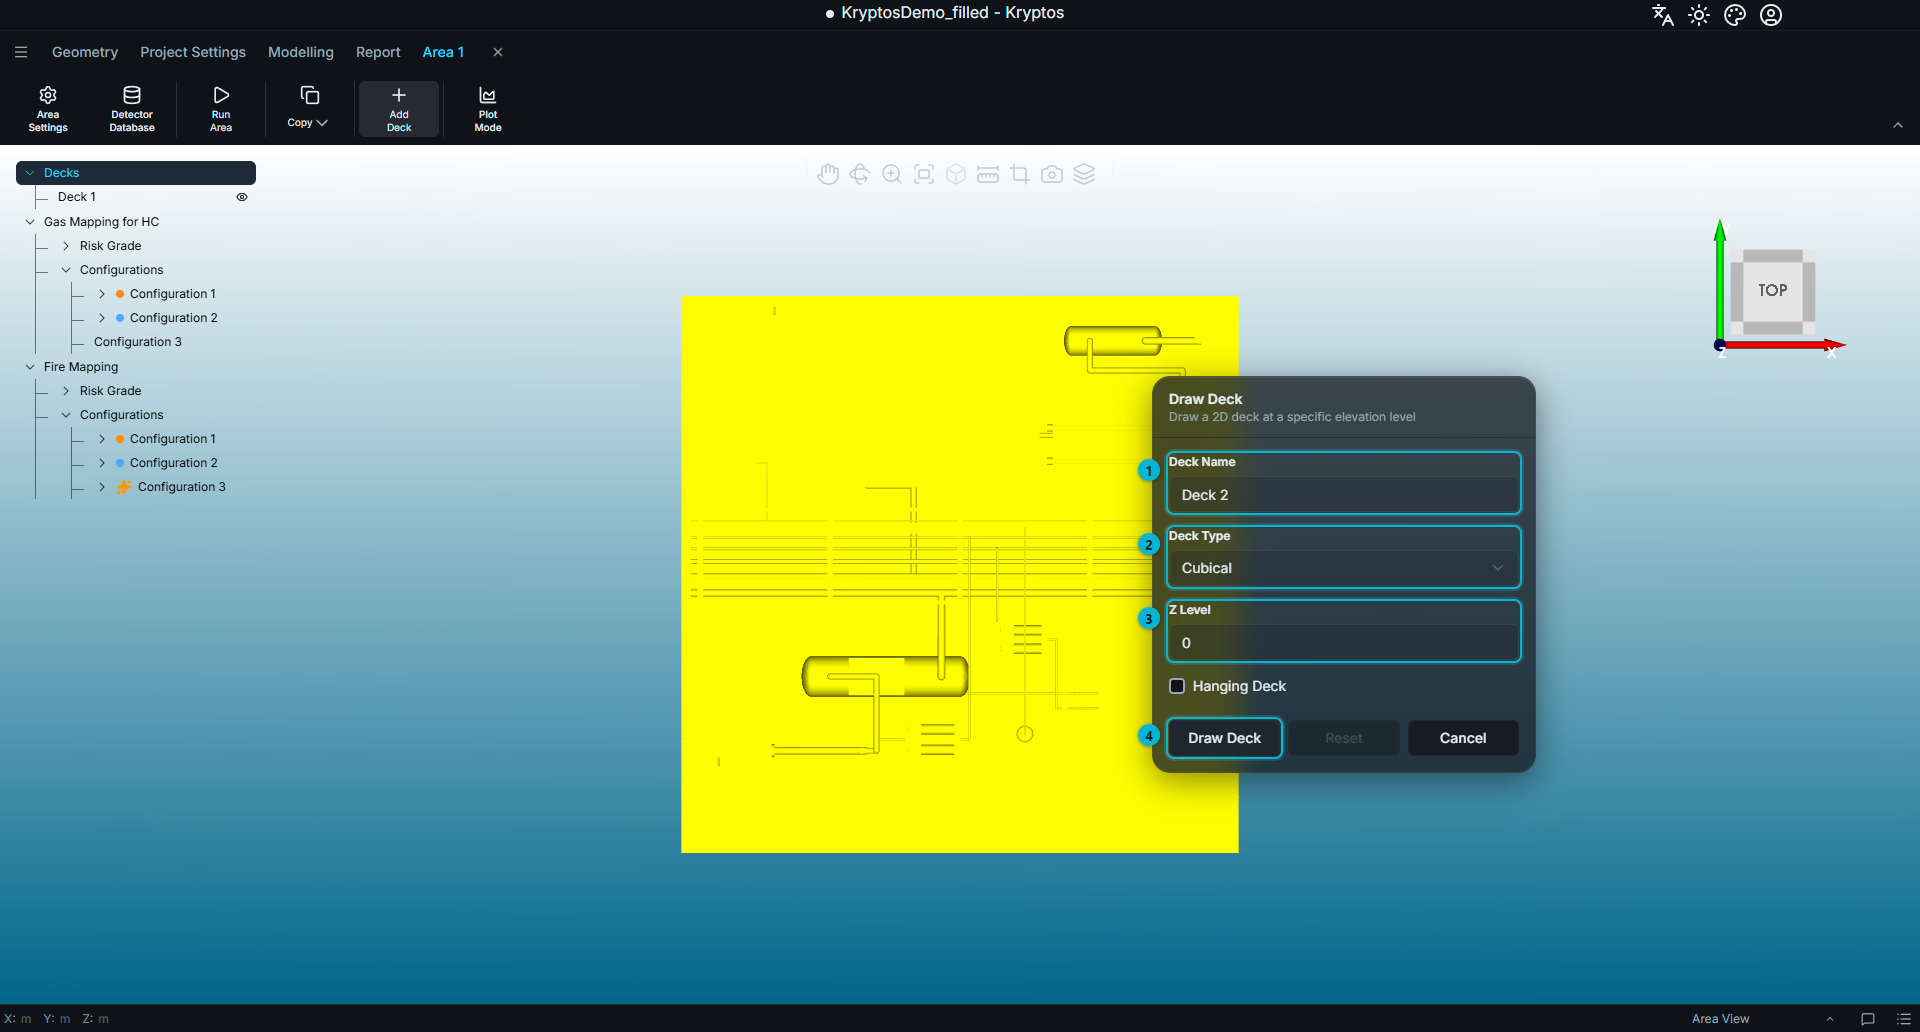
- Deck Name — specifies the name displayed for the deck in the area tree.
- Deck Type — selects the deck shape: Cubical, Cylindrical or Polygonal.
- Z Level — specifies the elevation at which the deck is located.
- Draw Deck — activates drawing mode in the 3D viewport.
Decks are always drawn horizontally on the XY plane, at the specified Z (elevation) level.
Click Draw Deck and draw the required shape in the 3D viewport. Once drawing starts, the button changes to Complete, with Reset and Cancel options also available.
- Complete — finishes the drawing and creates the deck.
- Reset — clears the current drawing so you can start again.
- Cancel — exits drawing mode without completing the deck.
The Three Shapes
Kryptos supports three deck shapes.
Cubical
Move the cursor in the 3D viewport to draw a rectangular deck of the required size. Once the shape has been created, use the white handles to adjust its dimensions.
Cylindrical
Move the cursor in the 3D viewport to draw a circular deck.
- The centre handle moves the entire deck.
- The handle on the circumference adjusts its radius.
- The current radius is displayed along the line connecting the two handles as you drag.
Polygonal
Click at successive locations in the 3D viewport to place points and define a deck with a custom outline.
The middle mouse button switches between straight line segments and a smooth curve.
Step 2: Check the Fire Settings
Before starting an optimisation or rearrangement, check the fire mapping settings. These determine the coverage targets Kryptos works towards, the permissible detector placement orientations and the fire detection criteria used in the calculations.
| Setting | What Kryptos uses it for |
|---|---|
| Risk Grade Types → Coverage Targets | Defines the fire coverage targets Kryptos aims to achieve at each voting level. A target of 0% means there is no coverage requirement at that level. |
| Fire Optimisation Settings | Defines the permissible fire detector placement limits, including the height range above a deck, the range for detectors suspended below a deck and the allowable detector tilt angles. |
| Area Settings → Fire Mapping Parameters | Defines the fire detector model, its field of view and its detection ranges. |
| Area Settings → Fire Detection Method | Defines how a fire is represented and how successful detection is evaluated during coverage calculations. |
WARNING
The default detector tilt limits are −40° to −5°. Both values are negative: −40° is the minimum and −5° is the maximum.
Make sure these values are entered in the correct order. The minimum tilt must be lower than the maximum tilt; otherwise, the settings cannot be saved.
Step 3: Start the Optimisation
For new users of Kryptos, it is recommended that you run an optimisation in a new, empty configuration. This preserves your existing detector layouts in other configurations while Kryptos generates a new one.
Under the fire mapping in the area tree, select Configurations and add a new configuration.
With the new configuration selected, click Start Optimisation in the ribbon.
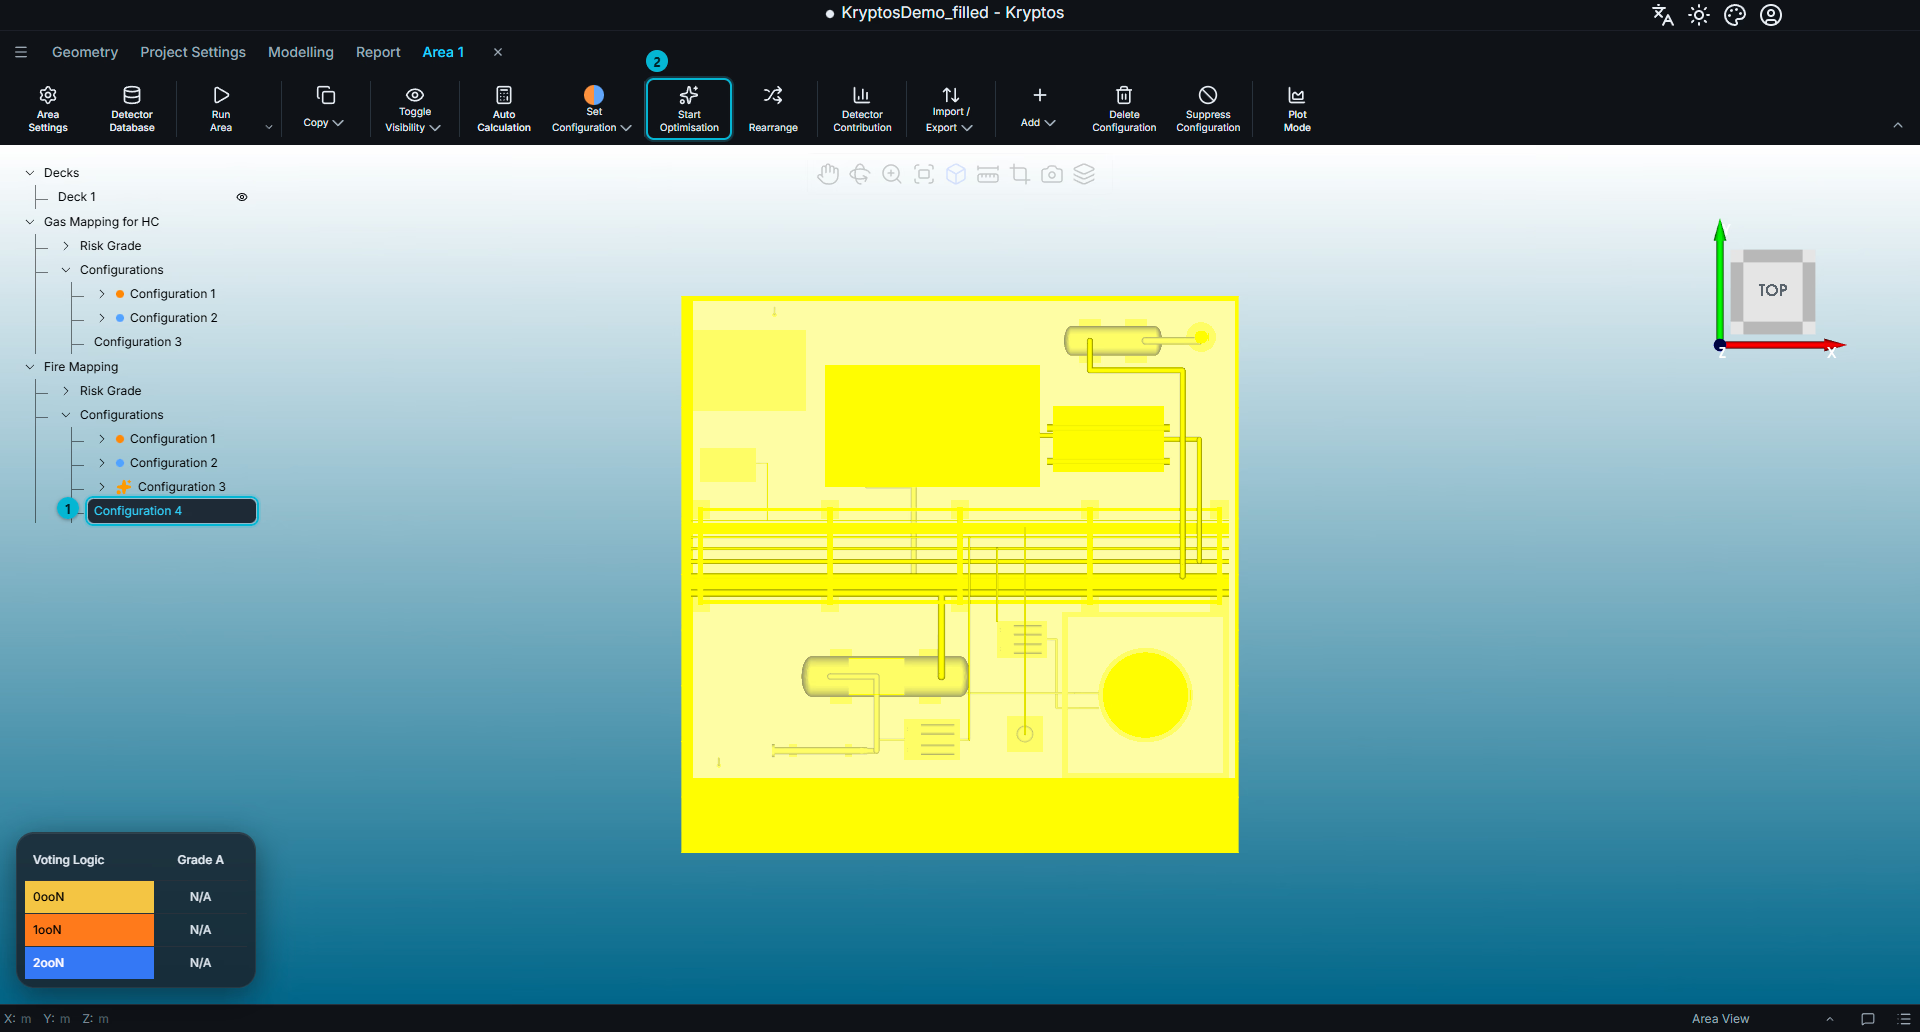
- Configuration — the new, empty configuration in which Kryptos will create the detector layout.
- Start Optimisation — starts the optimisation process.
Kryptos automatically determines suitable detector locations and adds the resulting detectors to the selected configuration.
Watching Progress
The optimisation is submitted as a job and appears in the Job Queue, accessible from the bottom bar. You can monitor its progress there.
Click the running job's card to view a live coverage chart.
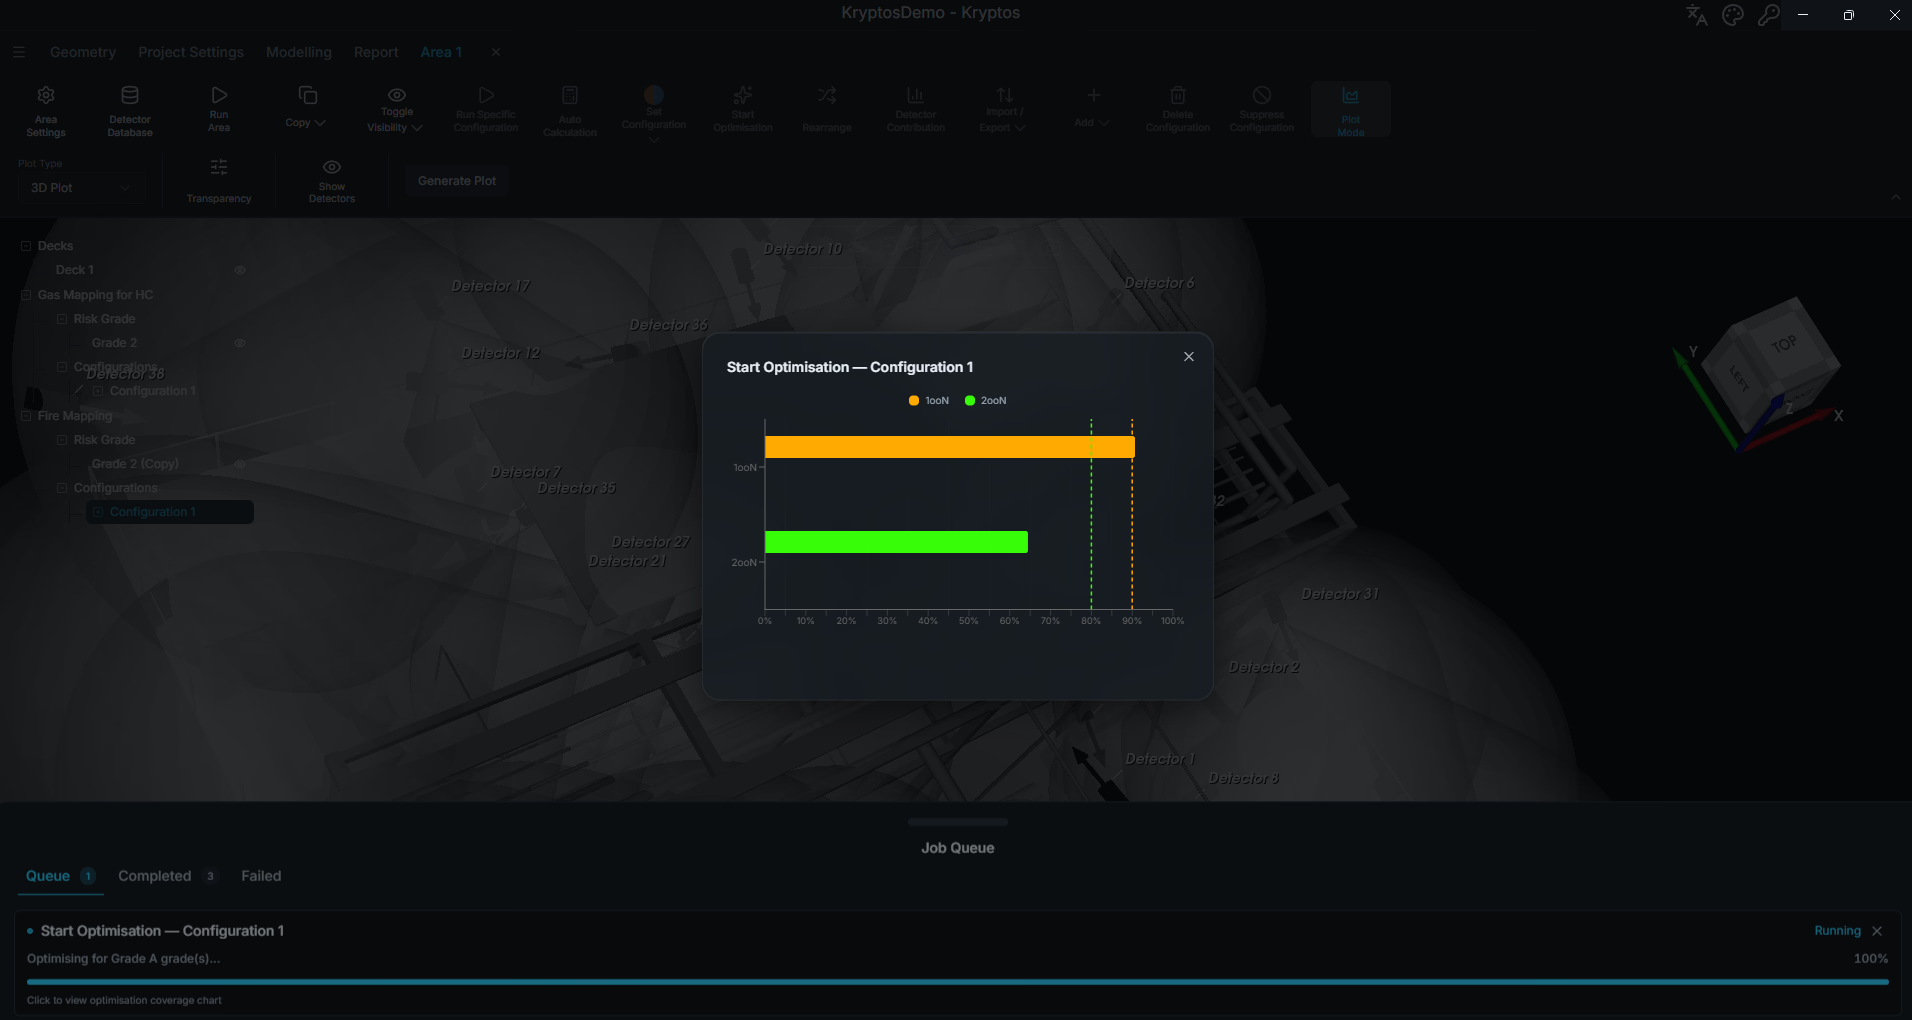
Each bar represents the coverage achieved so far at a particular voting level. The dashed lines indicate the corresponding coverage targets that Kryptos is working towards.
Keeping detectors where they are
If certain detectors must remain in fixed positions, add them to the configuration manually and lock them before starting the optimisation.
Kryptos will retain locked detectors in their existing positions and orientations and will consider them in the coverage calculations. Kryptos optimiser places additional detectors around them to achieve the necessary coverage target. Locked detectors are not moved or modified during the optimisation.
Rearrangement
Use Rearrangement when you already have a detector layout and want Kryptos to improve it by repositioning the existing detectors, rather than creating a new layout from scratch.
Rearrangement requires the same groundwork as optimisation:
- Suitable decks must be defined.
- The fire settings must be configured.
- The selected configuration must already contain detectors to rearrange.
Select the configuration in the area tree, then click Rearrange in the ribbon.
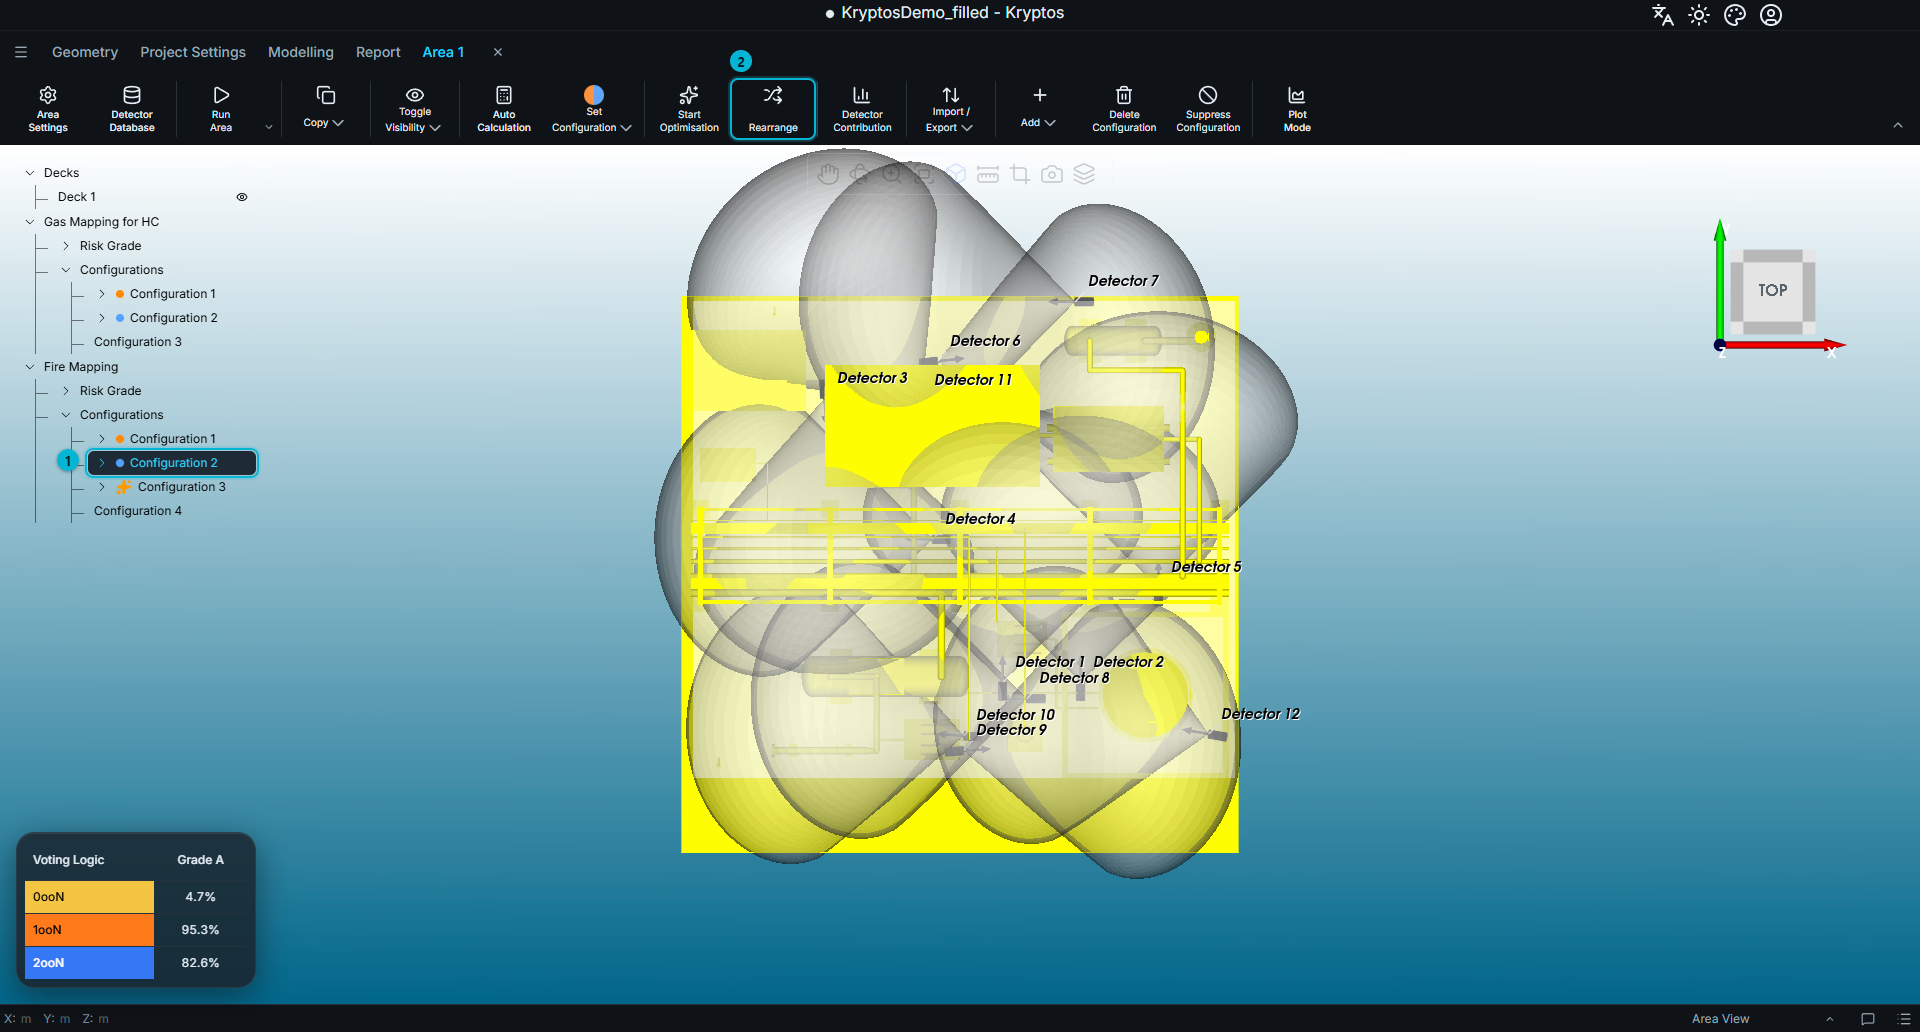
- Configuration — the configuration whose detector layout you want to rearrange.
- Rearrange — opens the rearrangement options.
Rearrangement Options
Choose how you want Kryptos to rearrange the detectors.
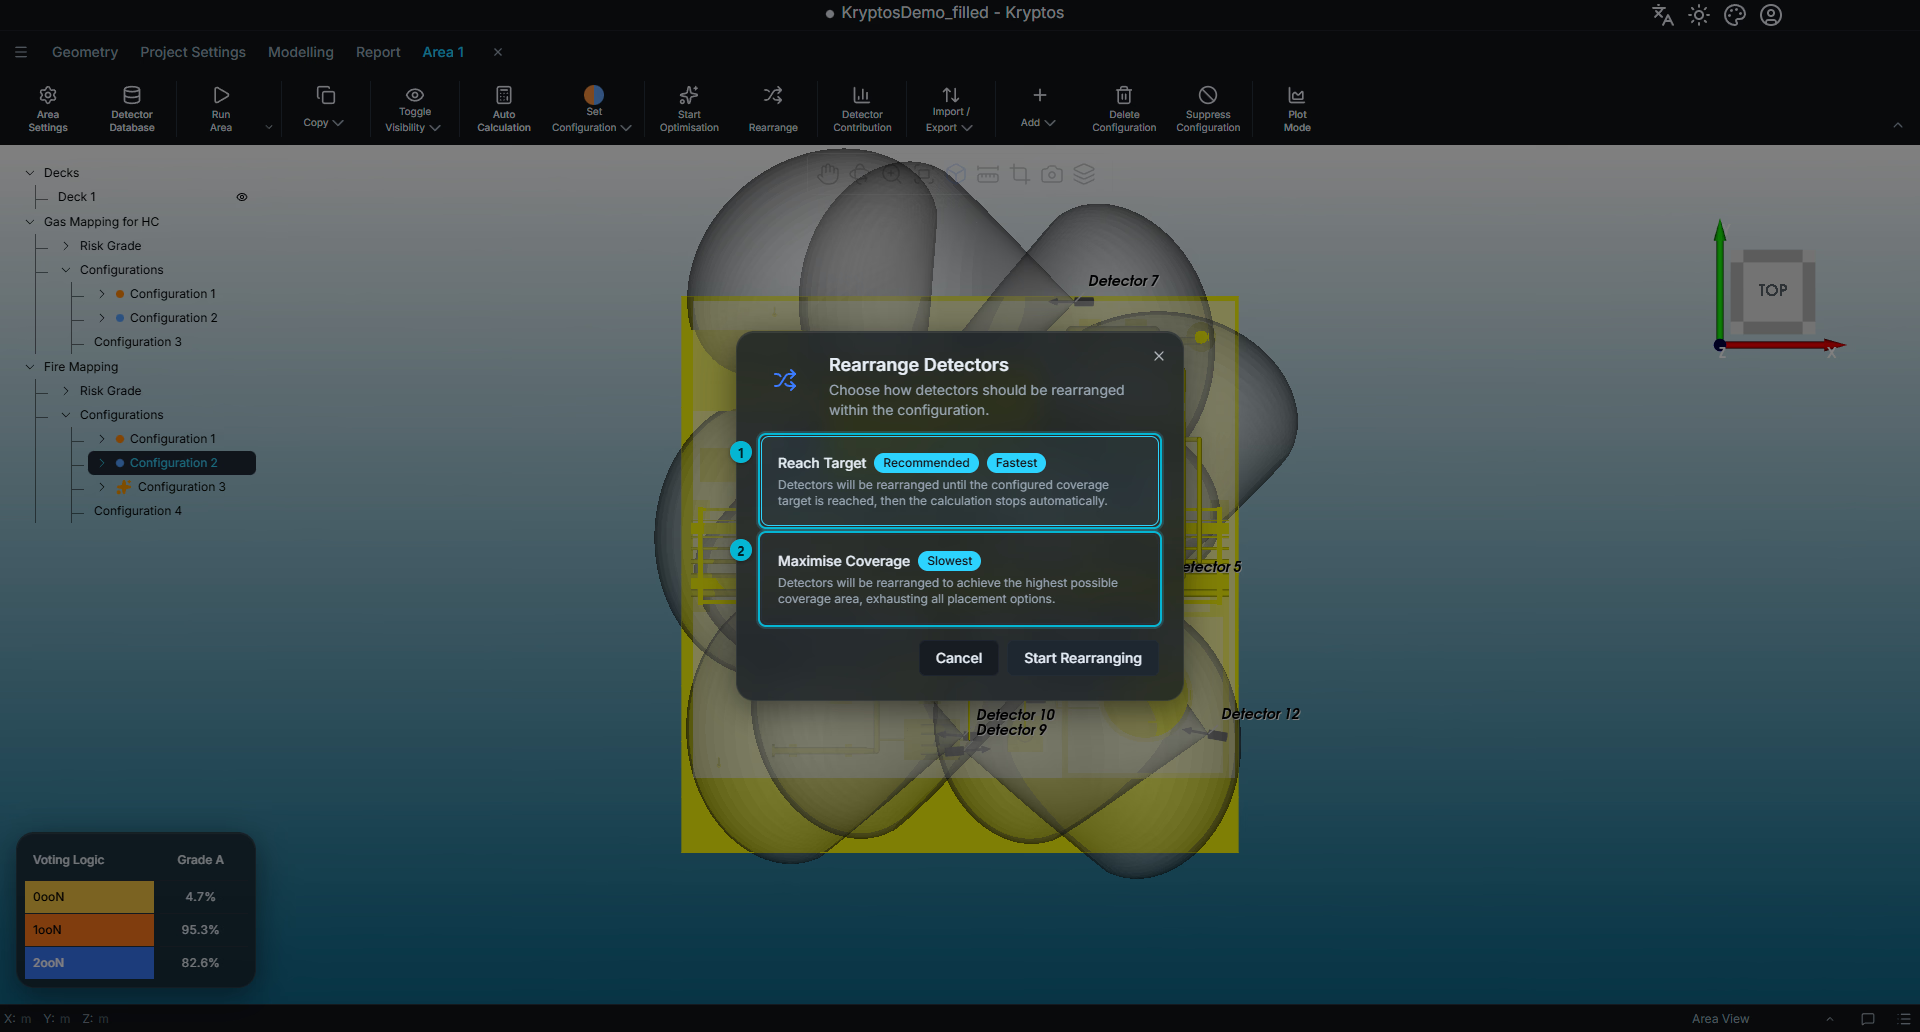
Two options are available:
- Reach Target — repositions detectors until the coverage targets defined in Risk Grade Types are achieved, then stops. Detectors that are not required to meet the targets are suppressed, and Kryptos identifies them for you. This is the faster option.
- Maximise Coverage — continues rearranging the detector layout to achieve the highest coverage possible using all the preset number of detectors available in that configuration. This is the more time-consuming option.
Click Start Rearranging to begin. The job appears in the Job Queue, where you can monitor its progress using the same live coverage chart available during optimisation.
TIP
When Maximise Coverage finishes, Kryptos also indicates how many detectors are required to meet the specified coverage targets.
This helps you assess the number of detectors actually needed to satisfy the coverage requirements, rather than simply maximising the possible coverage from the number of detectors in the layout.
Related
- Mapping — creating grades and configurations, and locking detectors
- Project Settings — configuring coverage targets and fire detector placement limits
- 3D Gas Optimisation & Decks — following a similar workflow for gas detector optimisation